| Line 111: | Line 111: | ||
| Faster/stronger than a pike ball. |
| Faster/stronger than a pike ball. |
||
|- |
|- |
||
| + | | [[File:Boot.png]] |
||
| − | | |
||
| Boot |
| Boot |
||
| 300 |
| 300 |
||
| Double-tap up for a 2 hit spin kick. |
| Double-tap up for a 2 hit spin kick. |
||
|- |
|- |
||
| + | | [[File:Sash.png]] |
||
| − | | |
||
| Sash |
| Sash |
||
| 400 |
| 400 |
||
| Attack during a spin kick to drill through your foes. |
| Attack during a spin kick to drill through your foes. |
||
|- |
|- |
||
| + | | [[File:Cuff.png]] |
||
| − | | |
||
| Cuff |
| Cuff |
||
| 500 |
| 500 |
||
| Hold down attack to charge up a mighty elbow dash. |
| Hold down attack to charge up a mighty elbow dash. |
||
|- |
|- |
||
| + | | [[File:Tiara.png]] |
||
| − | | |
||
| Tiara |
| Tiara |
||
| 900 |
| 900 |
||
| Attack during an elbow dash for a powerful twirl attack. |
| Attack during an elbow dash for a powerful twirl attack. |
||
|- |
|- |
||
| + | | [[File:Key.png]] |
||
| − | | |
||
| Key |
| Key |
||
| - |
| - |
||
| Used to open locks. Found and used only in dungeons. |
| Used to open locks. Found and used only in dungeons. |
||
| − | |- |
||
| − | | |
||
| − | | |
||
| − | | |
||
| − | | |
||
|} |
|} |
||
Revision as of 03:52, 24 October 2013
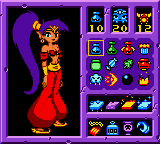
Shantae's inventory. Hey, how did she get 99 Baby Warp Squids?
Here is a list of items from Shantae for the GBC.[1]
Basic Items
| Img | Item Name | Cost | Description |
|---|---|---|---|
| Firefly | - | Collect all 12 of them to learn a special dance. | |
| Heart Holder | - | Add an extra heart to your life meter. | |
| 1up | - | Extra life. | |
| Small Heart | - | Restore one heart. | |
| Large Heart | - | Restores three hearts. | |
| Small Gem | - | Gives you 1 gem. Used to buy items and pay for the Healing Dance. | |
| Big Gem | - | Gives you 5 gems. Used to buy items and pay for the Healing Dance. | |
| Extra-Large Gem | - | Gives you 20 gems. Used to buy items and pay for the Healing Dance. | |
| Small Vial | 50 | Restores a few Hearts. | |
| Medium Vial | 75 | Restores several Hearts. | |
| Large Vial | 100 | Restores all Hearts. | |
| Vanish Cream | 30 | Lets you walk past enemies! | |
| Storm Puffs (20) | 25 | Tricky to use, but extremely powerful. | |
| Pike Balls (10) | 25 | These mines spin around your body and damage enemies if they touch them, for limited time. | |
| Float Muffins (20) | 20 | Give you protection against pits. | |
| Exit Candy | 20 | Used for exiting labyrinths. | |
| Flash Bolts (10) | 25 | Attack from a distance. | |
| Twin Mints | 30 | Doubles your attack power. | |
| Greedy Jars (5) | 30 | Makes enemies drop double the loot! | |
| Fireballs (10) | 20 | Faster/stronger than a pike ball. | |
| Boot | 300 | Double-tap up for a 2 hit spin kick. | |
| Sash | 400 | Attack during a spin kick to drill through your foes. | |
| Cuff | 500 | Hold down attack to charge up a mighty elbow dash. | |
| Tiara | 900 | Attack during an elbow dash for a powerful twirl attack. | |
| Key | - | Used to open locks. Found and used only in dungeons. |
Heart Holders
| # | Location | Required | Description |
|---|---|---|---|
| 1 | Scarecrow Field | / Cuff + Tiara | |
| 2 | Naga Wasteland | ||
| 3 | Spider Forest | / Cuff + Tiara | |
| 4 | Mud Bog | +/ | |
| 5 | Mens Desert | ||
| 6 | Archer Forest | + | |
| 7 | Mount Pointy |
Fireflies
There are twelve fireflies in Shantae. Getting all twelve will allow Shantae to learn the Healing Dance in the Firefly Shrine in Water Town. They only appear at night, and only in outdoor locations (so there's no point in searching in caves or dungeons).
| # | Location | Required | Description |
|---|---|---|---|
| 1 | Waterfall Lake | ||
| 2 | Rain Storm | - | |
| 3 | Scarecrow Field | - | |
| 4 | Snail Wasteland | ||
| 5 | Secret Waterfall Area | + | |
| 6 | Naga Wasteland | + | |
| 7 | Eagle Wasteland | + | |
| 8 | Mount Pointy | / | |
| 9 | Mud Bog | ||
| 10 | Ghost Forest | ||
| 11 | Ghost Forest | ||
| 12 | Archer Forest | - |
Transformation Talismans
| # | Name | Location | Required | Description |
|---|---|---|---|---|
| 1 | a cave in Hidden Forest |
|||
| 2 | a cave near Waterfall Lake or Snail Wasteland |
|||
| 3 | Mud Bog | |||
| 4 | Scarecrow Field | |||
Baby Warp Squids
| # | Location | Required | Description |
|---|---|---|---|
| 1 | Dribble Fountain | ||
| 2 | Dribble Fountain | ||
| 3 | Dribble Fountain | ||
| 4 | Dribble Fountain | ||
| 5 | Dribble Fountain | ||
| 6 | Golem Mine | ||
| 7 | Golem Mine | ||
| 8 | Golem Mine | ||
| 9 | Golem Mine | ||
| 10 | Golem Mine | ||
| 11 | Cackle Mound | ||
| 12 | Cackle Mound | ||
| 13 | Cackle Mound | ||
| 14 | Cackle Mound | ||
| 15 | Cackle Mound | ||
| 16 | Twinkle Palace | ||
| 17 | Twinkle Palace | ||
| 18 | Twinkle Palace | ||
| 19 | Twinkle Palace | ||
| 20 | Twinkle Palace |
References
- ↑ http://www.gamefaqs.com/gbc/550864-shantae/faqs/19368 Shantae FAQ by Daniel (FecalLord) Engel
| ||||||||||||||
| ||||||